Try it yourself
Here, we provide guidelines for setting up the simulation environment and submitting results.
Installation
Installation on your local environment
The simulator engine and the gym environment are incorporated into the docker image. You can pull it down to easily setup the environment.
The latest image version is 0.1.3, we will notify you if a new version is updated.
0
docker pull citybrainchallenge/cbengine:0.1.3
Then you can clone the code of the starter-kit.
git clone https://github.com/CityBrainChallenge/KDDCup2021-CityBrainChallenge-starter-kit.git
After pulled down the docker image and cloned the starter-kit, you can run a docker container and run the code of the starter-kit repo.
docker run -it -v /path/to/your/starter-kit:/starter-kit citybrainchallenge/cbengine:0.1.3 bash
cd starter-kit
# evaluate your solution on 1 traffic flow setting
python3 evaluate.py --input_dir agent --output_dir out --sim_cfg /starter-kit/cfg/simulator_round3_flow0.cfg --metric_period 120 --threshold 1.4
Installation on the computing platform
First, pull the starter-kit. Make sure the starter-kit is in ~/rllib_starter_kit/CBEngine_rllib_starterkit
cd ~/rllib_starter_kit
git clone https://github.com/CityBrainChallenge/KDDCup2021-CityBrainChallenge-starter-kit.git
cp -r KDDCup2021-CityBrainChallenge-starter-kit/. CBEngine_rllib_starterkit/
Then start docker container working. We have deployed ray environment in working. You could check it out by ray status
docker exec -it -u root working bash
ray status
Create sample traffic data
The python script for generating sample traffic is in the data folder. You can create your sample traffic flow data by executing,
python3 traffic_generator.py
Afterwards, you will find a newly created or updated flow_round3.txt file. Note that in following process, especially in training and evaluating your model on multiple traffic flow settings, we rename the file with flow_round3_flow*.txt and then create a new config file in cfg/simulator_round3_flow*.cfg (* indexed the traffic flow settings). To align with the code, you should make sure that the name of traffic flow file match with the configuration file. For more information about traffic_generator.py, please visit document-1 or document-2.
Check the CBEngine
To check your simulation enviroment is ok, you can run demo.py in the starter-kit, where the actions are simply fixed. You need to overwrite the function of act() in agent.py to define the policy of signal phase selection (i.e., action). Also, participants could modify the CBEngine. Code is in demo.py.
python3 demo.py
The paramters simulator_cfg_file, gym_cfg, metric_period, vehicle_info_path are explained in APIs
agent.py is a simple example of a fixed time (traffic signal is pre-timed) agent coordinating the traffic signal. It use the current_step (i.e., current time step) from info to decide the phase.
Here load_roadnet imports the roadnet file.
intersections[key_id] = {
    'have_signal': bool,
    'end_roads': list of road_id. Roads that end at this intersection. The order is random.
    'start_roads': list of road_id. Roads that start at this intersection. The order is random.
    'lanes': list, contains the lane_id in. The order is explained in Docs.
}
roads[road_id] = {
    'start_inter':int. Start intersection_id.
    'end_inter':int. End intersection_id.
    'length': float. Road length.
    'speed_limit': float. Road speed limit.
    'num_lanes': int. Number of lanes in this road.
    'inverse_road':  Road_id of inverse_road.
    'lanes': dict. roads[road_id]['lanes'][lane_id] = list of 3 int value. Contains the Steerability of lanes.
              lane_id is road_id*100 + 0/1/2... For example, if road 9 have 3 lanes, then their id are 900, 901, 902
}
agents[agent_id] = list of length 8. contains the inroad0_id, inroad1_id, inroad2_id,inroad3_id, outroad0_id, outroad1_id, outroad2_id, outroad3_id
Training your model with rllib
Customize CBEngine interface
In the final phase, you can customize the CBEngine interface to define your own observation and reward, but you need to submit their customized CBEngine. Here is an example code to customize CBEngine interface:
class CBEngine_round3(CBEngine_rllib_class):
"""See CBEngine_rllib_class in /CBEngine_env/env/CBEngine_rllib/CBEngine_rllib.py

Need to implement reward.

implementation of observation is optional

"""
def __init__(self,config):
    super(CBEngine_round3,self).__init__(config)
    self.observation_features = self.gym_dict['observation_features']
    self.custom_observation = self.gym_dict['custom_observation']
    self.observation_dimension = self.gym_dict['observation_dimension']

def _get_observations(self):

    if(self.custom_observation == False):
        obs = super(CBEngine_round3, self)._get_observations()
        return obs
    else:
        ############
        # implement your own observation
        #
        # Example: lane_vehicle_num
        obs = {}
        lane_vehicle = self.eng.get_lane_vehicles()
        for agent_id, roads in self.agent_signals.items():
            result_obs = []
            for lane in self.intersections[agent_id]['lanes']:
                # -1 indicates empty roads in 'signal' of roadnet file
                if (lane == -1):
                    result_obs.append(-1)
                else:
                    # -2 indicates there's no vehicle on this lane
                    if (lane not in lane_vehicle.keys()):
                        result_obs.append(0)
                    else:
                        # the vehicle number of this lane
                        result_obs.append(len(lane_vehicle[lane]))
            # obs[agent_id] = {
            #     "observation" : your_observation
            # }
            # Here agent_id must be str

            obs[agent_id] = {"observation":result_obs}

        # Here agent_id must be str. So here change int to str
        int_agents = list(obs.keys())
        for k in int_agents:
            obs[str(k)] = obs[k]
            obs.pop(k)

        return obs
        ############

def _get_reward(self):

    rwds = {}

    ##################
    ## Example : pressure as reward.
    # if(self.observation_features[0] != 'lane_vehicle_num'):
    #     raise ValueError("maxpressure need 'lane_vehicle_num' as first observation feature") ``cfg/simulator_round3_flow*.cfg``. To align with the code, you should make sure that the name of traffic flow file match with the configuration file.
    # lane_vehicle = self.eng.get_lane_vehicles()
    # for agent_id, roads in self.agent_signals.items():
    #     result_obs = []
    #     for lane in self.intersections[agent_id]['lanes']:
    #         # -1 indicates empty roads in 'signal' of roadnet file
    #         if (lane == -1):
    #             result_obs.append(-1)
    #         else:
    #             # -2 indicates there's no vehicle on this lane
    #             if (lane not in lane_vehicle.keys()):
    #                 result_obs.append(0)
    #             else:
    #                 # the vehicle number of this lane
    #                 result_obs.append(len(lane_vehicle[lane]))
    #     pressure = (np.sum(result_obs[12: 24]) - np.sum(result_obs[0: 12]))
    #     rwds[agent_id] = pressure
    ##################

    ##################
    ## Example : queue length as reward.
    v_list = self.eng.get_vehicles()
    for agent_id in self.agent_signals.keys():
        rwds[agent_id] = 0
    for vehicle in v_list:
        vdict = self.eng.get_vehicle_info(vehicle)
        if(float(vdict['speed'][0])<0.5 and float(vdict['distance'][0]) > 1.0):
            if(int(vdict['road'][0]) in self.road2signal.keys()):
                agent_id = self.road2signal[int(vdict['road'][0])]
                rwds[agent_id]-=1
    # normalization for qlength reward
    for agent_id in self.agent_signals.keys():
        rwds[agent_id] /= 10

    ##################

    ##################
    ## Default reward, which can't be used in rllib
    ## self.lane_vehicle_state is dict. keys are agent_id(int), values are sets which maintain the vehicles of each lanes.

    # def get_diff(pre,sub):
    #     in_num = 0
    #     out_num = 0
    #     for vehicle in pre:
    #         if(vehicle not in sub):
    #             out_num +=1
    #     for vehicle in sub:
    #         if(vehicle not in pre):
    #             in_num += 1
    #     return in_num,out_num
    #
    # lane_vehicle = self.eng.get_lane_vehicles()
    #
    # for agent_id, roads in self.agents.items():
    #     rwds[agent_id] = []
    #     for lane in self.intersections[agent_id]['lanes']:
    #         # -1 indicates empty roads in 'signal' of roadnet file
    #         if (lane == -1):
    #             rwds[agent_id].append(-1)
    #         else:
    #             if(lane not in lane_vehicle.keys()):
    #                 lane_vehicle[lane] = set()
    #             rwds[agent_id].append(get_diff(self.lane_vehicle_state[lane],lane_vehicle[lane]))
    #             self.lane_vehicle_state[lane] = lane_vehicle[lane]
    ##################
    # Change int keys to str keys because agent_id in actions must be str
    int_agents = list(rwds.keys())
    for k in int_agents:
        rwds[str(k)] = rwds[k]
        rwds.pop(k)
return rwds
Participants can continue using the old observation used in qualification phase by set 'custom_observation' : False in gym_cfg.py. But reward should be implemented because reward in rllib needs to be single values. We provide 2 rewards , pressure and queue length , along with the old rewards.
Note that you are not allowed to use self.eng.log_vehicle_info() (otherwise, your solution will not be accepted), which means that you cannot access to the information about vehicle route and travel time at speed limit. Here is a table of the APIs (e.g., self.eng.get_vehicles()) that are allowable for the final phase:
API |
Returned value |
Description |
get_vehicle_count() |
int |
The total number of running vehicle |
get_vehicles() |
list |
A list of running vehicles’ ids |
get_lane_vehicle_count() |
dict |
A dict. Keys are lane_id, values are number of running vehicles on this lane. |
get_lane_vehicles() |
dict |
A dict. Keys are lane_id, values are a list of running vehicles on this lane. |
get_vehicle_speed() |
dict |
A dict. Keys are vehicle_id of running vehicles, values are their speed |
get_average_travel_time() |
float |
The average travel time of both running vehicles and finished vehicles. |
get_vehicle_info(vehicle_id) |
dict |
Input vehicle_id, output the information of the vehicle as a dict. |
Training example of rllib
We provide example codes for training in rllib and evaluating the model from rllib.
- rllib_train.py:
It’s an example code of training model in rllib.
In
train.shwe provide a simple training command for /starter-kit/cfg/simulator_round3_flow0.cfg. You could use it to check the environment.Note that the training result will be in
model/$algorithm/$foldername/checkpoint_*/checkpoint-*.The detail argument description is in code. And for detail of rllib, please refer to rllib.
Code is in rllib_train.py
If you use it in local environment, please comment line 143.
# ray.init(address = "auto")An example of training and evaluating command is here.
python3 rllib_train.py --sim_cfg /starter-kit/cfg/simulator_round3_flow0.cfg --algorithm DQN --stop-iters 5 --foldername train_result --num_workers 1 --thread_num 4
python3 rllib_test.py --sim_cfg /starter-kit/cfg/simulator_round3_flow0.cfg --algorithm DQN --iteration 5 --foldername train_result --metric_period 120 --thread_num 4
Evaluation
Default evaluation method
- Here in default evaluation method, inputs are
agent that control the signal. (input_dir)
out directory. (score directory)
simulation config that defines the flow. (sim_cfg).
vehicle log directory where info_step *.log in. (vehicle_info_path)
thread number of CBEngine. (thread_num)
the evaluation interval. (metric_period)
threshold of delay index. (threshold)
evaluate.sh is an example scoring script that output the scores of your agent in multiple sample traffic flow settings;
evaluate.py is a scoring script that evaluate your agent only in single traffic flow setting. It is similar to evaluate.py in the qualification phase. Detairs on how to evaluate your solution is shown below,
# run evaluation on single traffic flow
python3 evaluate.py --input_dir agent --output_dir out --sim_cfg /starter-kit/cfg/simulator_round3_flow0.cfg  --metric_period 120 --threshold 1.4 --vehicle_info_path log --thread_num 4

# run evaluation on a set of traffic flow in parallel
bash evaluate.sh agent out log 1
The single traffic flow evaluation result will be output at /starter-kit/out/$flow_number/scores.json. In final phase, your solution is evaluated every 120 seconds for scoring (i.e., metric_period=120).
Efficient evaluation for a learning-based model
For learning-based model of rllib, we also provide an extra more efficient evaluation framework. But you can still use the default evaluation method.
- rllit_test.py:
We provide a script
rllib_test.pyto evaluate your model of rllib. You could set your own arguments to evaluate the model.Again, the model file is in
model/$algorithm/$foldername/checkpoint_*/checkpoint-*after training. Inrllib_test.py, you could set the arguments--algorithm,--foldername,--iterationto load and evaluate the model. You could refer torllib_evaluate.sh, which is a simple evaluating bash script to userllib_test.py.Result will be in
/log/$flow_number/$folder_name/$iteration. Here $flow_number is the number ofsimulator_round3_flow*.cfg.When submission, you could load the
checkpoint-*file in your agent.py. We provide an exampleagent_rllib.pyin the starterkit.Don’t open lots of evaluating processes in parallel. It may exceed the memory limit of computing platform!!!!
Here is an example agent of loading the rllib model in rllib_test.py.
class RLlibTFCheckpointPolicy():
    def __init__(
        self, load_path, algorithm, policy_name, observation_space, action_space
    ):
        self._checkpoint_path = load_path
        self._algorithm = algorithm
        self._policy_name = policy_name
        self._observation_space = observation_space
        self._action_space = action_space
        self._sess = None

        if isinstance(action_space, gym.spaces.Box):
            self.is_continuous = True
        elif isinstance(action_space, gym.spaces.Discrete):
            self.is_continuous = False
        else:
            raise TypeError("Unsupport action space")

        if self._sess:
            return

        if self._algorithm == "PPO":
            from ray.rllib.agents.ppo.ppo_tf_policy import PPOTFPolicy as LoadPolicy
        elif self._algorithm in ["A2C", "A3C"]:
            from ray.rllib.agents.a3c.a3c_tf_policy import A3CTFPolicy as LoadPolicy
        elif self._algorithm == "PG":
            from ray.rllib.agents.pg.pg_tf_policy import PGTFPolicy as LoadPolicy
        elif self._algorithm in ["DQN","APEX"]:
            from ray.rllib.agents.dqn.dqn_tf_policy import DQNTFPolicy as LoadPolicy
        else:
            raise TypeError("Unsupport algorithm")

        self._prep = ModelCatalog.get_preprocessor_for_space(self._observation_space)
        self._sess = tf.Session(graph=tf.Graph())
        self._sess.__enter__()

        with tf.name_scope(self._policy_name):
            # obs_space need to be flattened before passed to PPOTFPolicy
            flat_obs_space = self._prep.observation_space
            self.policy = LoadPolicy(flat_obs_space, self._action_space, {})
            objs = pickle.load(open(self._checkpoint_path, "rb"))
            objs = pickle.loads(objs["worker"])
            state = objs["state"]
            weights = state[self._policy_name]
            list_keys = list(weights.keys())
            for k in list_keys:
                if(k not in self.policy.get_weights().keys()):
                    weights.pop(k)
            self.policy.set_weights(weights)

    def act(self, obs):
        action = {}
        if isinstance(obs, list):
            # batch infer
            obs = [self._prep.transform(o) for o in obs]
            action = self.policy.compute_actions(obs, explore=False)[0]
        elif isinstance(obs, dict):
            for k,v in obs.items():
                obs = self._prep.transform(v)
                action[k] = self.policy.compute_actions([obs], explore=False)[0][0]
        else:
            # single infer
            obs = self._prep.transform(obs)
            action = self.policy.compute_actions([obs], explore=False)[0][0]

        return action
Results
Results will be saved as /starter-kit/out/scores.json, the data format of results is exemplified as follows.
{
  "success": true,
  "error_msg": "", // if "success" is false, "error_msg" stores the exception
  "data": {
    "total_served_vehicles": 1047, // if "success" is false, here it rethe replay of your intermediate results after your solution being evaluated. Here `mapbox token` and `yarn` are required. You can get a `mapbox token` by registering a mapbox account.turns -1
    "delay_index": 2.3582080966292374 // if "success" is false, here it returns -1
  }
}
Visualization
You can visualize the replay of your intermediate results after your solution being evaluated. Here mapbox token and yarn are required. You can get a mapbox token by registering a mapbox account.
The visualization process will run in your local environment (not the docker environment). To prepare for visualization, you need to install yarn (npm is required) in your local environment.
open the /KDDCup2021-CityBrainChallenge-starter-kit folder. copy the files
lightinfo.json,roadinfo.json,time*.jsonin /log folder and paste into your newly created /ui/src/log folder. Here,
lightinfo.jsonrecords the information of traffic light.roadinfo.jsonrecords the information of road network.time*.jsonfiles record the intermediate results over all time steps, for example,time0.jsonrecords the results at the first step.
modify /ui/src/index.js
mapboxgl.accessToken = Your_Token; # your mapbox default public key
this.maxTime = max_of_time*.json # if the last file of your ``time*.json`` files is ``time359.json``, it is 359.
cd to /ui (make sure run “yarn start” in your local environment instead of docker environment)
yarn
yarn start
the replay of your intermediate results after your solution being evaluated. Here mapbox token and yarn are required. You can get a mapbox token by registering a mapbox account.
open localhost:3000 with your browser (If report “JavaScript heap out of memory”, please refer to this website)
Here are some Tips:
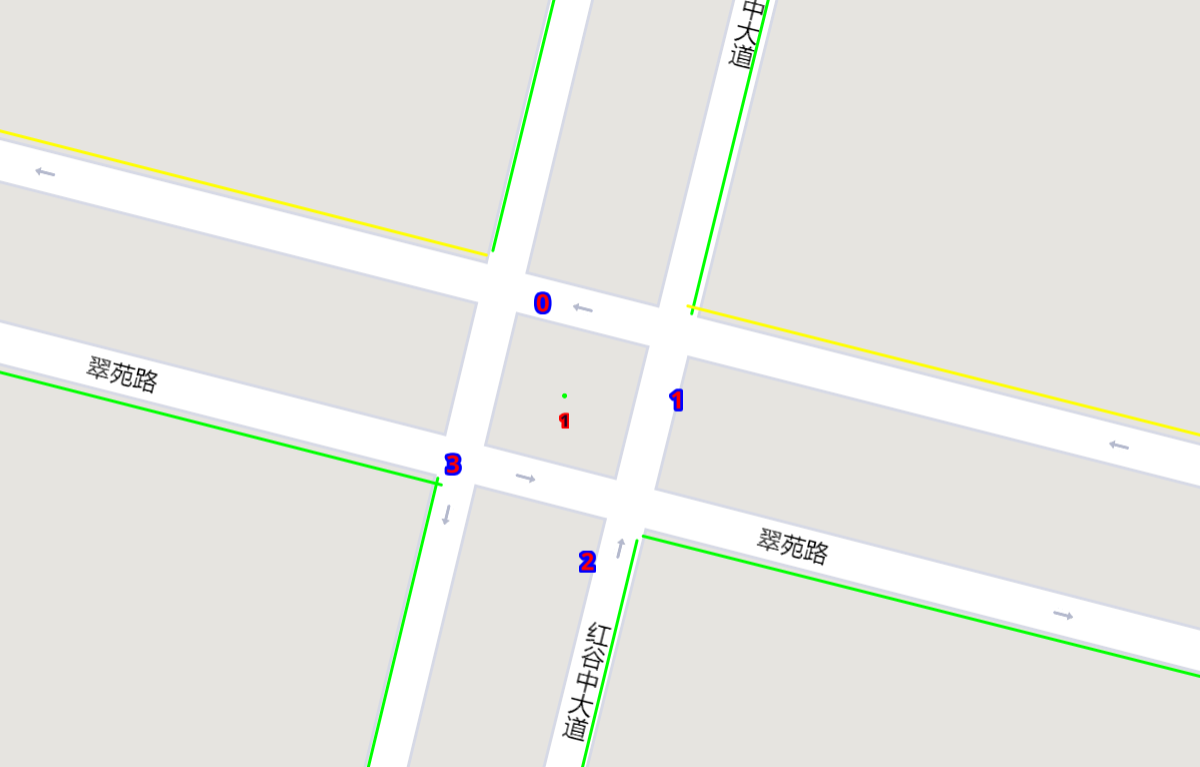
Sky blue indicates left-turning vehicles, dark blue indicates going straight vehicles, and dark green indicates right-turning vehicles.
Lines indicate roads. The color of the line represents the average speed of the road.
Here’s an example of an intersection in ui. The number in the center (with red background) indicates the current phase number. The number of each road segment help you to identify the permissible movements of current phase, for example, in current phase-1, 0 and 2 left-turn movements are given right-of-way. For more information about signal phase, please refer to Action.
Make a submission
- Important tips:
In the final phase, you should also submit
CBEngine_round3.py. See CBEngine_round3. So all participants should submitCBEngine_round3.py,agent.py,gym_cfg.py.
To submit the models for evaluation, participants need to modify the starter-kit and place all the model-related files (including but not limited to
agent.pyand deep learning model files) into theagentfolder. Compress the agent folder and name it asagent.zipto make the submission. Note that you need to directly compress theagentfolder, rather than a group of files.Participants need to train their models offline and submit the trained models along with
agent.py, which will load them.All submissions should follow the format of our sample code in starter-kit . Hence, please do not modify any file outside the
agentfolder, except the.cfgfile (The.cfgfile can be revised to incorporate different training traffic).If your model need to import or load some files, please put them to the
agentfolder and make sure to use the absolute path. Examples are shown at the beginning of fixed timeagent.py.Please also make sure to only use the packages in the given docker file, so that your code can be executed at the evaluation platform.
Participants can report the python package required to build the model if these packages are not included in the current docker environment. The support team will evaluate the request and determine whether to add the package to the provided docker environment.
Participants are responsible for ensuring that all the submissions can be successfully tested under the given evaluation framework.