Welcome to CityBrainChallenge’s documentation!
City Brain Challenge
In this challenge, we will provide you with a city-scale road network and its traffic demand derived from real traffic data. You will be in charge of coordinating the traffic signals to maximize number of vehicles served while maintaining an acceptable delay. We will increase the traffic demand and see whether your coordination model can still survive.
Problem
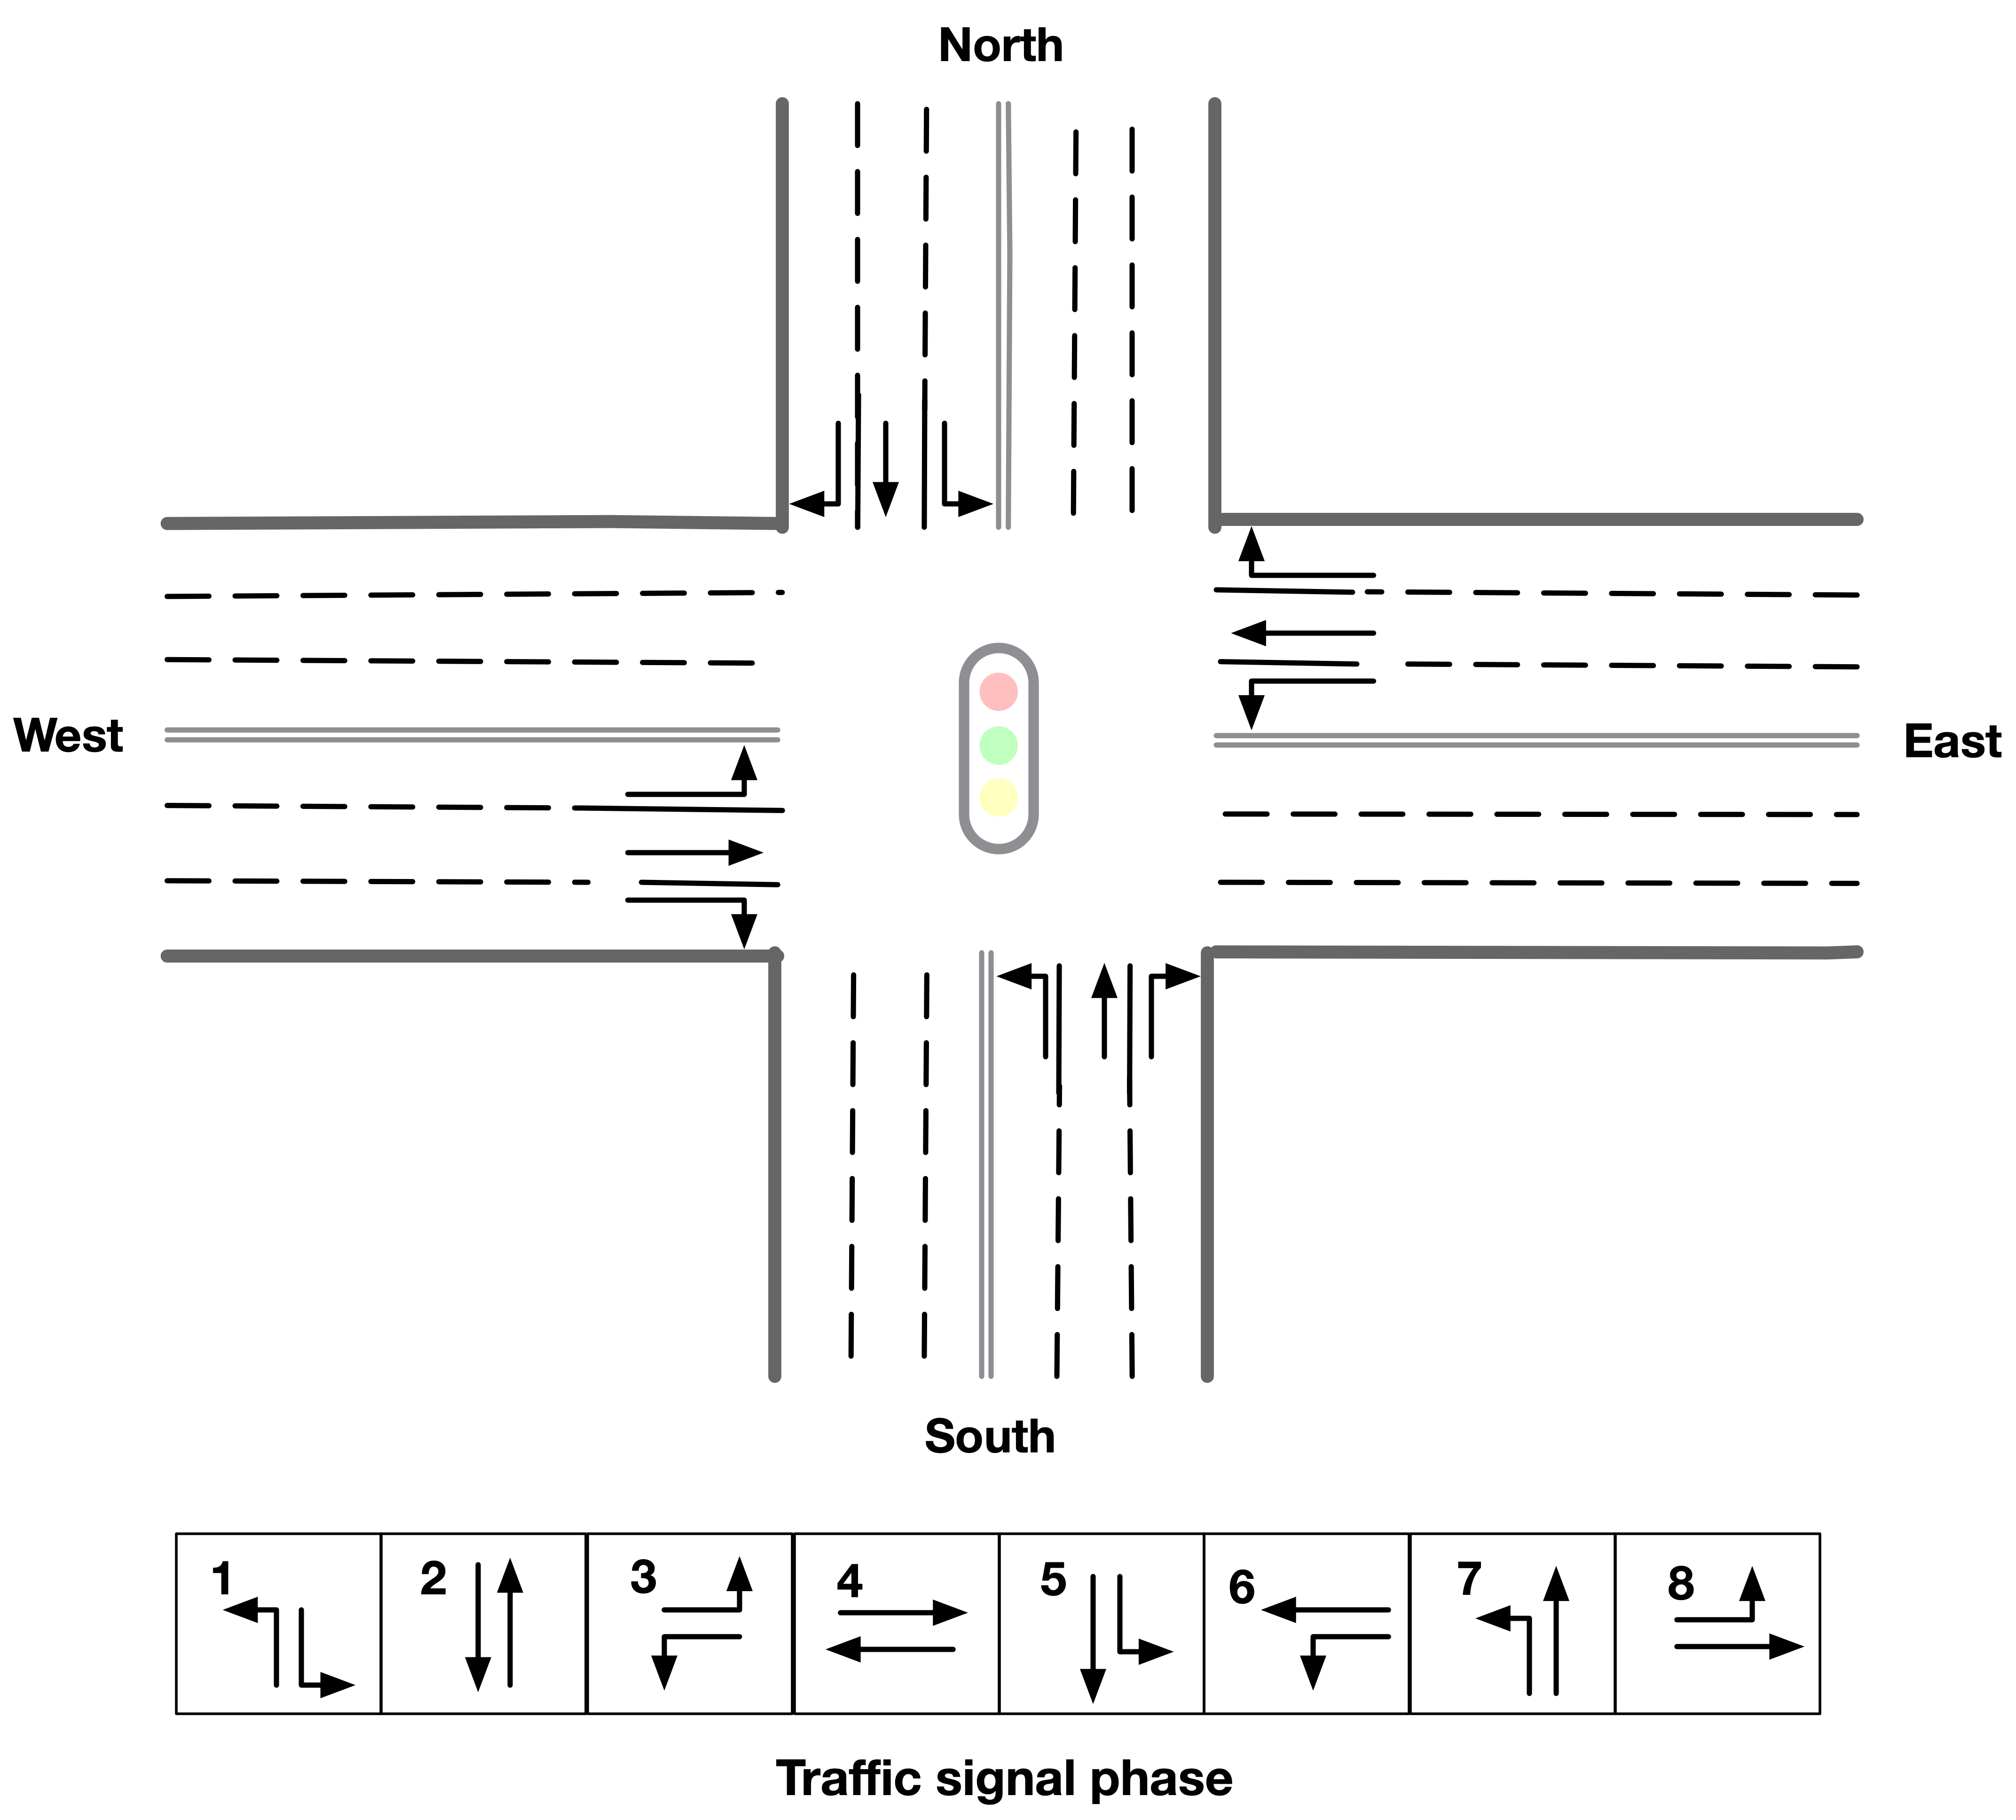
Traffic signals coordinate the traffic movements at the intersection and a smart traffic signal coordination algorithm is the key to transportation efficiency. For a four-leg intersection (see figure below), 1 of 8 types of signal phases can be selected each period of time step, serving a pair of non-conflict traffic movements (e.g., phase-1 gives right-of-way for left-turn traffic from northern and southern approaches). In this competition, participants need to develop a model to select traffic signal phases at intersections of a road network to improve road network traffic performance.
In the final phase, a city-scale road network sample traffic data is provided. We use exactly the same road network but different traffic data for scoring your submissions. Participants are encouraged to use the python script to generate your own sample traffic data for training and testing since the traffic settings for evaluation is not revealed.
Evaluation
Total number of vehicles served (i.e., total number of vehicles entering the network) and delay index will be computed every 20 seconds to evaluate your submissions. The evaluation process will be terminated once the delay index reaches the predefined threshold 1.40.
The trip delay index is computed as actual travel time divided by travel time at free-flow speed. For an uncompleted trip, the free-flow speed is used to estimate the travel time of rest of the trip. The delay index is computed as average trip delay index over all vehicles served: \(D = \frac{1}{N}\sum_{i=1}^{N}{D_{i}}\).
- The trip delay \(D_{i}\) of vehicle \(i\) is defined as \(D_{i} = \frac{TT_{i} + TT_{i}^{r}}{TT_{i}^{f}}\), where,
\(TT_i\): travel time of vehicle \(i\);
\(TT_{i}^{r}\): rest of trip travel time, estimated with free-flow speed;
\(TT_{i}^{f}\): full trip travel time at free-flow speed
We will evaluate your solution on multiple traffic flow settings. The total number of served vehicles is computed over all evaluation scenarios. The overall delay index is computed as the average delay index among all vehicles of all scenarios.
The submission scoring and ranking process follows three principles:
Solutions that served more vehicles will rank higher.
If two solutions served the same number of vehicles, the one with lower delay index will rank higher.
If two solutions served the same number of vehicles with same delay index, the one submitted earlier will rank higher.
Try it yourself
Here, we provide guidelines for setting up the simulation environment and submitting results.
Installation
Installation on your local environment
The simulator engine and the gym environment are incorporated into the docker image. You can pull it down to easily setup the environment.
The latest image version is 0.1.3, we will notify you if a new version is updated.
0
docker pull citybrainchallenge/cbengine:0.1.3
Then you can clone the code of the starter-kit.
git clone https://github.com/CityBrainChallenge/KDDCup2021-CityBrainChallenge-starter-kit.git
After pulled down the docker image and cloned the starter-kit, you can run a docker container and run the code of the starter-kit repo.
docker run -it -v /path/to/your/starter-kit:/starter-kit citybrainchallenge/cbengine:0.1.3 bash
cd starter-kit
# evaluate your solution on 1 traffic flow setting
python3 evaluate.py --input_dir agent --output_dir out --sim_cfg /starter-kit/cfg/simulator_round3_flow0.cfg --metric_period 120 --threshold 1.4
Installation on the computing platform
First, pull the starter-kit. Make sure the starter-kit is in ~/rllib_starter_kit/CBEngine_rllib_starterkit
cd ~/rllib_starter_kit
git clone https://github.com/CityBrainChallenge/KDDCup2021-CityBrainChallenge-starter-kit.git
cp -r KDDCup2021-CityBrainChallenge-starter-kit/. CBEngine_rllib_starterkit/
Then start docker container working. We have deployed ray environment in working. You could check it out by ray status
docker exec -it -u root working bash
ray status
Create sample traffic data
The python script for generating sample traffic is in the data folder. You can create your sample traffic flow data by executing,
python3 traffic_generator.py
Afterwards, you will find a newly created or updated flow_round3.txt file. Note that in following process, especially in training and evaluating your model on multiple traffic flow settings, we rename the file with flow_round3_flow*.txt and then create a new config file in cfg/simulator_round3_flow*.cfg (* indexed the traffic flow settings). To align with the code, you should make sure that the name of traffic flow file match with the configuration file. For more information about traffic_generator.py, please visit document-1 or document-2.
Check the CBEngine
To check your simulation enviroment is ok, you can run demo.py in the starter-kit, where the actions are simply fixed. You need to overwrite the function of act() in agent.py to define the policy of signal phase selection (i.e., action). Also, participants could modify the CBEngine. Code is in demo.py.
python3 demo.py
The paramters simulator_cfg_file, gym_cfg, metric_period, vehicle_info_path are explained in APIs
agent.py is a simple example of a fixed time (traffic signal is pre-timed) agent coordinating the traffic signal. It use the current_step (i.e., current time step) from info to decide the phase.
Here load_roadnet imports the roadnet file.
intersections[key_id] = {
    'have_signal': bool,
    'end_roads': list of road_id. Roads that end at this intersection. The order is random.
    'start_roads': list of road_id. Roads that start at this intersection. The order is random.
    'lanes': list, contains the lane_id in. The order is explained in Docs.
}
roads[road_id] = {
    'start_inter':int. Start intersection_id.
    'end_inter':int. End intersection_id.
    'length': float. Road length.
    'speed_limit': float. Road speed limit.
    'num_lanes': int. Number of lanes in this road.
    'inverse_road':  Road_id of inverse_road.
    'lanes': dict. roads[road_id]['lanes'][lane_id] = list of 3 int value. Contains the Steerability of lanes.
              lane_id is road_id*100 + 0/1/2... For example, if road 9 have 3 lanes, then their id are 900, 901, 902
}
agents[agent_id] = list of length 8. contains the inroad0_id, inroad1_id, inroad2_id,inroad3_id, outroad0_id, outroad1_id, outroad2_id, outroad3_id
Training your model with rllib
Customize CBEngine interface
In the final phase, you can customize the CBEngine interface to define your own observation and reward, but you need to submit their customized CBEngine. Here is an example code to customize CBEngine interface:
class CBEngine_round3(CBEngine_rllib_class):
"""See CBEngine_rllib_class in /CBEngine_env/env/CBEngine_rllib/CBEngine_rllib.py

Need to implement reward.

implementation of observation is optional

"""
def __init__(self,config):
    super(CBEngine_round3,self).__init__(config)
    self.observation_features = self.gym_dict['observation_features']
    self.custom_observation = self.gym_dict['custom_observation']
    self.observation_dimension = self.gym_dict['observation_dimension']

def _get_observations(self):

    if(self.custom_observation == False):
        obs = super(CBEngine_round3, self)._get_observations()
        return obs
    else:
        ############
        # implement your own observation
        #
        # Example: lane_vehicle_num
        obs = {}
        lane_vehicle = self.eng.get_lane_vehicles()
        for agent_id, roads in self.agent_signals.items():
            result_obs = []
            for lane in self.intersections[agent_id]['lanes']:
                # -1 indicates empty roads in 'signal' of roadnet file
                if (lane == -1):
                    result_obs.append(-1)
                else:
                    # -2 indicates there's no vehicle on this lane
                    if (lane not in lane_vehicle.keys()):
                        result_obs.append(0)
                    else:
                        # the vehicle number of this lane
                        result_obs.append(len(lane_vehicle[lane]))
            # obs[agent_id] = {
            #     "observation" : your_observation
            # }
            # Here agent_id must be str

            obs[agent_id] = {"observation":result_obs}

        # Here agent_id must be str. So here change int to str
        int_agents = list(obs.keys())
        for k in int_agents:
            obs[str(k)] = obs[k]
            obs.pop(k)

        return obs
        ############

def _get_reward(self):

    rwds = {}

    ##################
    ## Example : pressure as reward.
    # if(self.observation_features[0] != 'lane_vehicle_num'):
    #     raise ValueError("maxpressure need 'lane_vehicle_num' as first observation feature") ``cfg/simulator_round3_flow*.cfg``. To align with the code, you should make sure that the name of traffic flow file match with the configuration file.
    # lane_vehicle = self.eng.get_lane_vehicles()
    # for agent_id, roads in self.agent_signals.items():
    #     result_obs = []
    #     for lane in self.intersections[agent_id]['lanes']:
    #         # -1 indicates empty roads in 'signal' of roadnet file
    #         if (lane == -1):
    #             result_obs.append(-1)
    #         else:
    #             # -2 indicates there's no vehicle on this lane
    #             if (lane not in lane_vehicle.keys()):
    #                 result_obs.append(0)
    #             else:
    #                 # the vehicle number of this lane
    #                 result_obs.append(len(lane_vehicle[lane]))
    #     pressure = (np.sum(result_obs[12: 24]) - np.sum(result_obs[0: 12]))
    #     rwds[agent_id] = pressure
    ##################

    ##################
    ## Example : queue length as reward.
    v_list = self.eng.get_vehicles()
    for agent_id in self.agent_signals.keys():
        rwds[agent_id] = 0
    for vehicle in v_list:
        vdict = self.eng.get_vehicle_info(vehicle)
        if(float(vdict['speed'][0])<0.5 and float(vdict['distance'][0]) > 1.0):
            if(int(vdict['road'][0]) in self.road2signal.keys()):
                agent_id = self.road2signal[int(vdict['road'][0])]
                rwds[agent_id]-=1
    # normalization for qlength reward
    for agent_id in self.agent_signals.keys():
        rwds[agent_id] /= 10

    ##################

    ##################
    ## Default reward, which can't be used in rllib
    ## self.lane_vehicle_state is dict. keys are agent_id(int), values are sets which maintain the vehicles of each lanes.

    # def get_diff(pre,sub):
    #     in_num = 0
    #     out_num = 0
    #     for vehicle in pre:
    #         if(vehicle not in sub):
    #             out_num +=1
    #     for vehicle in sub:
    #         if(vehicle not in pre):
    #             in_num += 1
    #     return in_num,out_num
    #
    # lane_vehicle = self.eng.get_lane_vehicles()
    #
    # for agent_id, roads in self.agents.items():
    #     rwds[agent_id] = []
    #     for lane in self.intersections[agent_id]['lanes']:
    #         # -1 indicates empty roads in 'signal' of roadnet file
    #         if (lane == -1):
    #             rwds[agent_id].append(-1)
    #         else:
    #             if(lane not in lane_vehicle.keys()):
    #                 lane_vehicle[lane] = set()
    #             rwds[agent_id].append(get_diff(self.lane_vehicle_state[lane],lane_vehicle[lane]))
    #             self.lane_vehicle_state[lane] = lane_vehicle[lane]
    ##################
    # Change int keys to str keys because agent_id in actions must be str
    int_agents = list(rwds.keys())
    for k in int_agents:
        rwds[str(k)] = rwds[k]
        rwds.pop(k)
return rwds
Participants can continue using the old observation used in qualification phase by set 'custom_observation' : False in gym_cfg.py. But reward should be implemented because reward in rllib needs to be single values. We provide 2 rewards , pressure and queue length , along with the old rewards.
Note that you are not allowed to use self.eng.log_vehicle_info() (otherwise, your solution will not be accepted), which means that you cannot access to the information about vehicle route and travel time at speed limit. Here is a table of the APIs (e.g., self.eng.get_vehicles()) that are allowable for the final phase:
API |
Returned value |
Description |
get_vehicle_count() |
int |
The total number of running vehicle |
get_vehicles() |
list |
A list of running vehicles’ ids |
get_lane_vehicle_count() |
dict |
A dict. Keys are lane_id, values are number of running vehicles on this lane. |
get_lane_vehicles() |
dict |
A dict. Keys are lane_id, values are a list of running vehicles on this lane. |
get_vehicle_speed() |
dict |
A dict. Keys are vehicle_id of running vehicles, values are their speed |
get_average_travel_time() |
float |
The average travel time of both running vehicles and finished vehicles. |
get_vehicle_info(vehicle_id) |
dict |
Input vehicle_id, output the information of the vehicle as a dict. |
Training example of rllib
We provide example codes for training in rllib and evaluating the model from rllib.
- rllib_train.py:
It’s an example code of training model in rllib.
In
train.shwe provide a simple training command for /starter-kit/cfg/simulator_round3_flow0.cfg. You could use it to check the environment.Note that the training result will be in
model/$algorithm/$foldername/checkpoint_*/checkpoint-*.The detail argument description is in code. And for detail of rllib, please refer to rllib.
Code is in rllib_train.py
If you use it in local environment, please comment line 143.
# ray.init(address = "auto")An example of training and evaluating command is here.
python3 rllib_train.py --sim_cfg /starter-kit/cfg/simulator_round3_flow0.cfg --algorithm DQN --stop-iters 5 --foldername train_result --num_workers 1 --thread_num 4
python3 rllib_test.py --sim_cfg /starter-kit/cfg/simulator_round3_flow0.cfg --algorithm DQN --iteration 5 --foldername train_result --metric_period 120 --thread_num 4
Evaluation
Default evaluation method
- Here in default evaluation method, inputs are
agent that control the signal. (input_dir)
out directory. (score directory)
simulation config that defines the flow. (sim_cfg).
vehicle log directory where info_step *.log in. (vehicle_info_path)
thread number of CBEngine. (thread_num)
the evaluation interval. (metric_period)
threshold of delay index. (threshold)
evaluate.sh is an example scoring script that output the scores of your agent in multiple sample traffic flow settings;
evaluate.py is a scoring script that evaluate your agent only in single traffic flow setting. It is similar to evaluate.py in the qualification phase. Detairs on how to evaluate your solution is shown below,
# run evaluation on single traffic flow
python3 evaluate.py --input_dir agent --output_dir out --sim_cfg /starter-kit/cfg/simulator_round3_flow0.cfg  --metric_period 120 --threshold 1.4 --vehicle_info_path log --thread_num 4

# run evaluation on a set of traffic flow in parallel
bash evaluate.sh agent out log 1
The single traffic flow evaluation result will be output at /starter-kit/out/$flow_number/scores.json. In final phase, your solution is evaluated every 120 seconds for scoring (i.e., metric_period=120).
Efficient evaluation for a learning-based model
For learning-based model of rllib, we also provide an extra more efficient evaluation framework. But you can still use the default evaluation method.
- rllit_test.py:
We provide a script
rllib_test.pyto evaluate your model of rllib. You could set your own arguments to evaluate the model.Again, the model file is in
model/$algorithm/$foldername/checkpoint_*/checkpoint-*after training. Inrllib_test.py, you could set the arguments--algorithm,--foldername,--iterationto load and evaluate the model. You could refer torllib_evaluate.sh, which is a simple evaluating bash script to userllib_test.py.Result will be in
/log/$flow_number/$folder_name/$iteration. Here $flow_number is the number ofsimulator_round3_flow*.cfg.When submission, you could load the
checkpoint-*file in your agent.py. We provide an exampleagent_rllib.pyin the starterkit.Don’t open lots of evaluating processes in parallel. It may exceed the memory limit of computing platform!!!!
Here is an example agent of loading the rllib model in rllib_test.py.
class RLlibTFCheckpointPolicy():
    def __init__(
        self, load_path, algorithm, policy_name, observation_space, action_space
    ):
        self._checkpoint_path = load_path
        self._algorithm = algorithm
        self._policy_name = policy_name
        self._observation_space = observation_space
        self._action_space = action_space
        self._sess = None

        if isinstance(action_space, gym.spaces.Box):
            self.is_continuous = True
        elif isinstance(action_space, gym.spaces.Discrete):
            self.is_continuous = False
        else:
            raise TypeError("Unsupport action space")

        if self._sess:
            return

        if self._algorithm == "PPO":
            from ray.rllib.agents.ppo.ppo_tf_policy import PPOTFPolicy as LoadPolicy
        elif self._algorithm in ["A2C", "A3C"]:
            from ray.rllib.agents.a3c.a3c_tf_policy import A3CTFPolicy as LoadPolicy
        elif self._algorithm == "PG":
            from ray.rllib.agents.pg.pg_tf_policy import PGTFPolicy as LoadPolicy
        elif self._algorithm in ["DQN","APEX"]:
            from ray.rllib.agents.dqn.dqn_tf_policy import DQNTFPolicy as LoadPolicy
        else:
            raise TypeError("Unsupport algorithm")

        self._prep = ModelCatalog.get_preprocessor_for_space(self._observation_space)
        self._sess = tf.Session(graph=tf.Graph())
        self._sess.__enter__()

        with tf.name_scope(self._policy_name):
            # obs_space need to be flattened before passed to PPOTFPolicy
            flat_obs_space = self._prep.observation_space
            self.policy = LoadPolicy(flat_obs_space, self._action_space, {})
            objs = pickle.load(open(self._checkpoint_path, "rb"))
            objs = pickle.loads(objs["worker"])
            state = objs["state"]
            weights = state[self._policy_name]
            list_keys = list(weights.keys())
            for k in list_keys:
                if(k not in self.policy.get_weights().keys()):
                    weights.pop(k)
            self.policy.set_weights(weights)

    def act(self, obs):
        action = {}
        if isinstance(obs, list):
            # batch infer
            obs = [self._prep.transform(o) for o in obs]
            action = self.policy.compute_actions(obs, explore=False)[0]
        elif isinstance(obs, dict):
            for k,v in obs.items():
                obs = self._prep.transform(v)
                action[k] = self.policy.compute_actions([obs], explore=False)[0][0]
        else:
            # single infer
            obs = self._prep.transform(obs)
            action = self.policy.compute_actions([obs], explore=False)[0][0]

        return action
Results
Results will be saved as /starter-kit/out/scores.json, the data format of results is exemplified as follows.
{
  "success": true,
  "error_msg": "", // if "success" is false, "error_msg" stores the exception
  "data": {
    "total_served_vehicles": 1047, // if "success" is false, here it rethe replay of your intermediate results after your solution being evaluated. Here `mapbox token` and `yarn` are required. You can get a `mapbox token` by registering a mapbox account.turns -1
    "delay_index": 2.3582080966292374 // if "success" is false, here it returns -1
  }
}
Visualization
You can visualize the replay of your intermediate results after your solution being evaluated. Here mapbox token and yarn are required. You can get a mapbox token by registering a mapbox account.
The visualization process will run in your local environment (not the docker environment). To prepare for visualization, you need to install yarn (npm is required) in your local environment.
open the /KDDCup2021-CityBrainChallenge-starter-kit folder. copy the files
lightinfo.json,roadinfo.json,time*.jsonin /log folder and paste into your newly created /ui/src/log folder. Here,
lightinfo.jsonrecords the information of traffic light.roadinfo.jsonrecords the information of road network.time*.jsonfiles record the intermediate results over all time steps, for example,time0.jsonrecords the results at the first step.
modify /ui/src/index.js
mapboxgl.accessToken = Your_Token; # your mapbox default public key
this.maxTime = max_of_time*.json # if the last file of your ``time*.json`` files is ``time359.json``, it is 359.
cd to /ui (make sure run “yarn start” in your local environment instead of docker environment)
yarn
yarn start
the replay of your intermediate results after your solution being evaluated. Here mapbox token and yarn are required. You can get a mapbox token by registering a mapbox account.
open localhost:3000 with your browser (If report “JavaScript heap out of memory”, please refer to this website)
Here are some Tips:
Sky blue indicates left-turning vehicles, dark blue indicates going straight vehicles, and dark green indicates right-turning vehicles.
Lines indicate roads. The color of the line represents the average speed of the road.
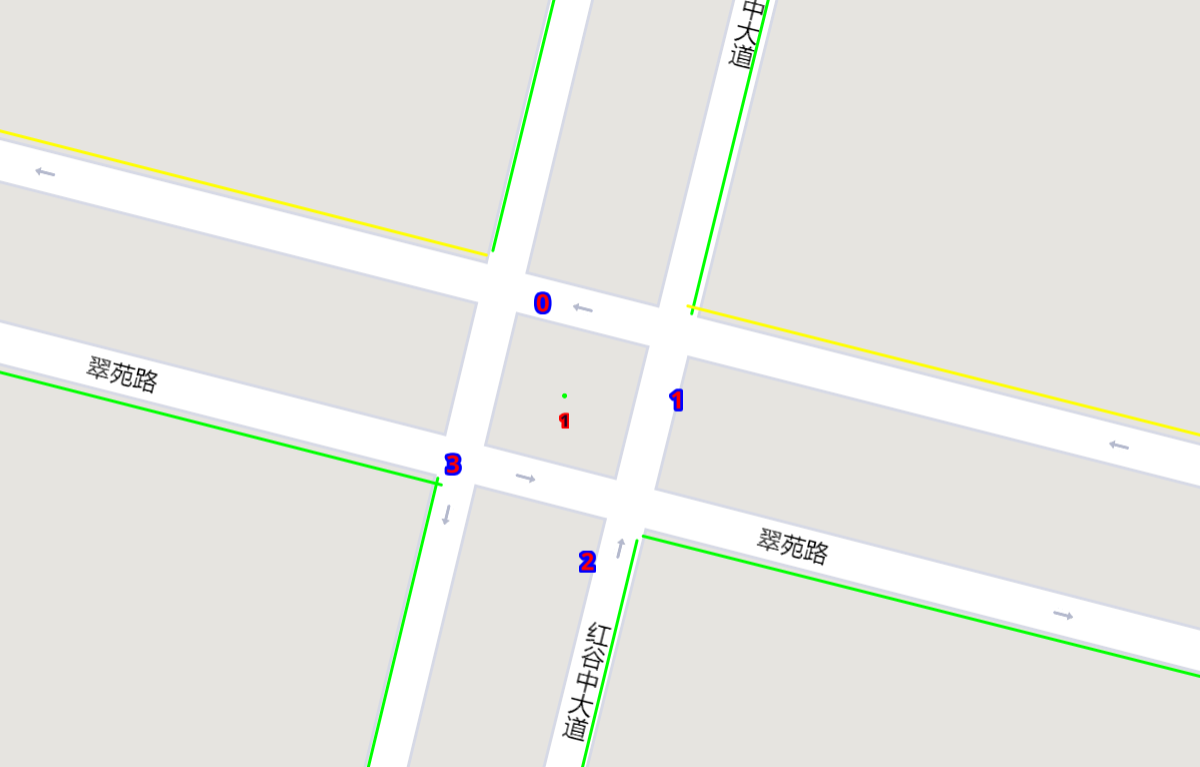
Here’s an example of an intersection in ui. The number in the center (with red background) indicates the current phase number. The number of each road segment help you to identify the permissible movements of current phase, for example, in current phase-1, 0 and 2 left-turn movements are given right-of-way. For more information about signal phase, please refer to Action.
Make a submission
- Important tips:
In the final phase, you should also submit
CBEngine_round3.py. See CBEngine_round3. So all participants should submitCBEngine_round3.py,agent.py,gym_cfg.py.
To submit the models for evaluation, participants need to modify the starter-kit and place all the model-related files (including but not limited to
agent.pyand deep learning model files) into theagentfolder. Compress the agent folder and name it asagent.zipto make the submission. Note that you need to directly compress theagentfolder, rather than a group of files.Participants need to train their models offline and submit the trained models along with
agent.py, which will load them.All submissions should follow the format of our sample code in starter-kit . Hence, please do not modify any file outside the
agentfolder, except the.cfgfile (The.cfgfile can be revised to incorporate different training traffic).If your model need to import or load some files, please put them to the
agentfolder and make sure to use the absolute path. Examples are shown at the beginning of fixed timeagent.py.Please also make sure to only use the packages in the given docker file, so that your code can be executed at the evaluation platform.
Participants can report the python package required to build the model if these packages are not included in the current docker environment. The support team will evaluate the request and determine whether to add the package to the provided docker environment.
Participants are responsible for ensuring that all the submissions can be successfully tested under the given evaluation framework.
Computing resource
In the final phase, a large-scale cloud computing platform is provided for all qualified teams. Followings are some details on computing resource allocation and usage.
Computing resource allocation
Basic computing resource
Each team will be assigned a computing cluster with 248 CPU cores, 640GB memory, and 1 TB hard disk storage as basic computing resource.
The basic computing resource will allow each team to run at least 30 simulator instances in parallel.
Bonus resource allocation
We will arrange 2 rounds of bonus resource allocation on 06/17 and 06/24 (UTC-12), respectively.
Top 10 teams by 2:00 PM (UTC-12) of the allocation day can apply for bonus computing resources (up to 144 CPU cores, 384GB memory per team).
Between 2:00 PM and 10:00 PM (UTC-12) of the allocation day, we will recycle and re-allocate the bonus computing resources. Participants cannot access the computing resources during this period.
Apply for bonus computing resource
To apply for bonus computing resource, the team leader needs to send an application email to citybrainchallenge@gmail.com before 2:00 PM (UTC-12) of the allocation day. Please use the same email address you used for registration.
The email only needs to contain a title: “Computing resource request - team XX (team name)” (Email content is not needed).
We will review all applications and grant bonus resources based on the CPU usage of a team in the previous allocation round and send a reponse by 10:00 PM (UTC-12) of the allocation day.
How to use the computing resource
Login
The top 20 qualified teams’ leaders will receive the login credentials along with the confirmation emails.
The login credential includes IP address (we will add up to 5 IP addresses to the whitelist for each team), user name, and password, which you can use to login to the assigned computing cluster (A ubuntu system is pre-installed).
Model development
Ray library and RLlib library are the default packages to support distributed model training. Sample codes of training models using RLlib are provided in
rllib_train.py.Participants can also use their own preferred distributed computing packages
Result and submission
Participants need to download their training log, results and models to their local storage. It is the responsibility of the participants to ensure the security of the data.
Participants still need to submit their model via the official website to get their leaderboard scores and official ranking.
Starter-kit
Participant will get a starter-kit. It contains:
# The examples of agent
agent/agent.py
agent/agent_MP.py
agent/agent_rllib.py
agent/checkpoint-25

# CBEngine config file
agent/gym_cfg.py

# To customize CBEngine interfaces
agent/CBEngine_round3.py

# sample traffic flow data and road network data
data/flow_round3.txt
...
data/roadnet_round3.txt
...

# demo script for generating sample traffic flow data
data/traffic_generator.py

# where you store your model
model/

# scoring script for single flow
evaluate.py

# evaluation and scoring script
evaluate.sh

# rllib train example
rllib_train.py

# example script for using rllib_train.py
train.sh

# rllib testing example
rllib_test.py

# script for parallel evaluating the model
rllib_evaluate.sh

# a simple demo to check your simulation environment. Note that **only** `observation` and `reward` could be modified. Please make sure that the dimension of `observation` is aligned with ``gym_cfg.py``. You could continue using the `observations` defined in the qualification phase, but the previous `reward` can't be used in `rllib` because `rllib` requires that each agent to be assigned with a `reward`. We provide 2 demo `rewards` definitions, "pressure" and "queue length", along with the old `reward` in the comment of default `CBEngine_round3.py``.
demo.py
Participants should implement their algorithm in agent.py. In the final phase, custom CBEngine_round3 is available. Participants can only revise the observation and reward of its agent.
Participants should submit their own
CBEngine_round3for training or evaluation. Note that only observation and reward could be modified. Please make sure that the dimension of observation is aligned withgym_cfg.py. You could continue using the observations defined in the qualification phase, but the previous reward can’t be used in rllib because rllib requires that each agent to be assigned with a reward of single value. We provide 2 demo rewards definitions, “pressure” and “queue length”, along with the old reward in the comment of defaultCBEngine_round3.py.Now the current step is not included in
observationby default. It is now included inobs['info']['step']The observation format is modified to align with rllib api. For more information, please refer to the observation
Now the keys (i.e. agent_id) of
actions,reward,observation,donesare str instead of int.Now env.reset return a dict: observation.
Now route and t_ff are removed from “vehicle_info” in final phase.
Environment - CBEngine
CBEngine is a microscopic traffic simulation engine that can support city-scale road network traffic simulation. CBEngine can support fast simulation of road network traffic with thousands of intersections and hundreds of thousands of vehicles. CBEngine is developed by the team from Yunqi Academy of Engineering. This team will provide timely support for this competition.
Data format
Roadnet File Format
Road network data
The road network file contains the following three datasets.
- Intersection dataset
Intersection data consists of identification, location and traffic signal installation information about each intersection. A snippet of intersection dataset is shown below.
92344 // total number of intersections
30.2795476000 120.1653304000 25926073 1 //latitude, longitude, inter_id, signalized
30.2801771000 120.1664368000 25926074 0
...
The attributes of intersection dataset are described in details as below.
Attribute Name
Example
Description
latitude
30.279547600
local latitude
longitude
120.1653304000
local longitude
inter_id
25926073
intersection ID
signalized
1
1 if traffic signal is installed, 0 otherwise
- Road dataset
Road dataset consists information about road segments in the network. In general, there are two directions on each road segment (i.e., dir1 and dir2). A snippet of road dataset is shown as follows.
2105 // total number of road segments
28571560 4353988632 93.2000000000 20 3 3 1 2
1 0 0 0 1 0 0 1 1 // dir1_mov: permissible movements of direction 1
1 0 0 0 1 0 0 1 1 // dir2_mov: permissible movements of direction 2
28571565 4886970741 170.2000000000 20 3 3 3 4
1 0 0 0 1 0 0 1 1
1 0 0 0 1 0 0 1 1
The attributes of road dataset are described in details as below. Direction 1 is <from_inter_id,to_inter_id>. Direction 2 is <to_inter_id,from_inter_id>.
Attribute Name
Example
Description
from_inter_id
28571560
upstream intersection ID w.r.t. dir1
to_inter_id
4353988632
downstream intersection ID w.r.t. dir1
length (m)
93.2000000000
length of road segment
speed_limit (m/s)
20
speed limit of road segment
dir1_num_lane
3
number of lanes of direction 1
dir2_num_lane
3
number of lanes of direction 2
dir1_id
1
road segment (edge) ID of direction 1
dir2_id
2
road segment (edge) ID of direction 2
dir1_mov
1 0 0 0 1 0 0 1 1
every 3 digits form a permissible movement indicator for a lane of direction 1, 100 indicates a left-turn only inner lane, 010 indicates through only middle lane, 011 indicates a shared through and right-turn outer lane.
dir2_mov
1 0 0 0 1 0 0 1 1
every 3 digits form a lane permissible movement indicator for a lane of direction 2.
- Traffic signal dataset
This dataset describes the connectivity between intersection and road segments. Note that, we assume that each intersection has no more than four approaches. The exiting approaches 1 to 4 starting from the northern one and rotating in clockwise direction. Here, -1 indicates that the corresponding approach is missing, which generally indicates a three-leg intersection.
107 // total number of signalized intersections
1317137908 724 700 611 609 // inter_id, approach1_id, approach2_id, approach3_id, approach4_id
672874599 311 2260 3830 -1 // -1 indicates a three-leg intersection without western approach
672879594 341 -1 2012 339
The attributes of road dataset is described in details as below
Attribute Name
Example
Description
inter_id
1317137908
intersection ID
approach1_id
724
road segment (edge) ID of northern exiting approach (Road_2 in example)
approach2_id
700
road segment (edge) ID of eastern exiting approach (Road_4 in example)
approach3_id
611
road segment (edge) ID of southern exiting approach (Road_6 in example)
approach4_id
609
road segment (edge) ID of western exiting approach (Road_8 in example)
Example
Here is an example 1x1 roadnet roadnet.txt .
5 // intersection data
30 120 0 1 // latitude, longitude, inter_id, signalized
31 120 1 0
30 121 2 0
29 120 3 0
30 119 4 0
4 // road data
0 1 30 20 3 3 1 2
1 0 0 0 1 0 0 0 1 // dir1_mov: permissible movements of direction 1
1 0 0 0 1 0 0 0 1 // dir2_mov: permissible movements of direction 2
0 2 30 20 3 3 3 4
1 0 0 0 1 0 0 0 1
1 0 0 0 1 0 0 0 1
0 3 30 20 3 3 5 6
1 0 0 0 1 0 0 0 1
1 0 0 0 1 0 0 0 1
0 4 30 20 3 3 7 8
1 0 0 0 1 0 0 0 1
1 0 0 0 1 0 0 0 1
1 // traffic signal data
0 1 3 5 7 // inter_id, approach1_id, approach2_id, approach3_id, approach4_id
Here provides an Illustration of example above.

Illustration of a 1x1 roadnet
Flow File Format
Flow file is composed by flows. Each flow is represented as a tuple (start_time, end_time, vehicle_interval, route), which means from start_time to end_time, there will be a vehicle with route every vehicle_interval seconds. The format of flows contains serval parts:
The first row of flow file is n, which means the number of flow.
The following 3n rows indicating configuration of each flow. Each flow have 3 configuration lines.
The first row consists of start_time, end_time, vehicle_interval.
The second row is the number of road segments of route for this flow : k.
The third row describes the route of this flow. Here flow’s route is defined by roads not intersections.
n
flow_1_start_time   flow_1_end_time flow_1_interval
k_1
flow_1_route_0      flow_1_route_1  ...     flow_1_route_k1

flow_2_start_time   flow_2_end_time flow_2_interval
k_2
flow_2_route_0      flow_2_route_1  ...     flow_2_route_k2

...

flow_n_start_time   flow_n_end_time flow_n_interval
k_n
flow_n_route_0      flow_n_route_1  ...     flow_n_route_k
Here is an example flow file
12 // n = 12
0 100 5 // start_time, end_time, vehicle_interval
2 // number of road segments
2 3 // road segment IDs
0 100 5
2
2 5
0 100 5
2
2 7
0 100 5
2
4 5
0 100 5
2
4 7
0 100 5
2
4 1
0 100 5
2
6 7
0 100 5
2
6 1
0 100 5
2
6 3
0 100 5
2
8 1
0 100 5
2
8 3
0 100 5
2
8 5
Observations
Participants will be able to get a full observation of the traffic on the road network at every 10 seconds, including vehicle-level information (e.g., position, speed) and lane-level information (e.g., average speed of each lane, number of vehicles on each lane). These observations will be helpful for decision-making on the traffic signal phase selection. Detailed description the features of observation can be found in agent/gym_cfg.py.
The format of observations could be found at annotation in code blocks in observation format.
Actions
For a traffic signal, there are at most 8 phases (1 - 8). Each phase allows a pair of non-conflict traffic movement to pass this intersection. Here are illustrations of the traffic movements and signal phase.
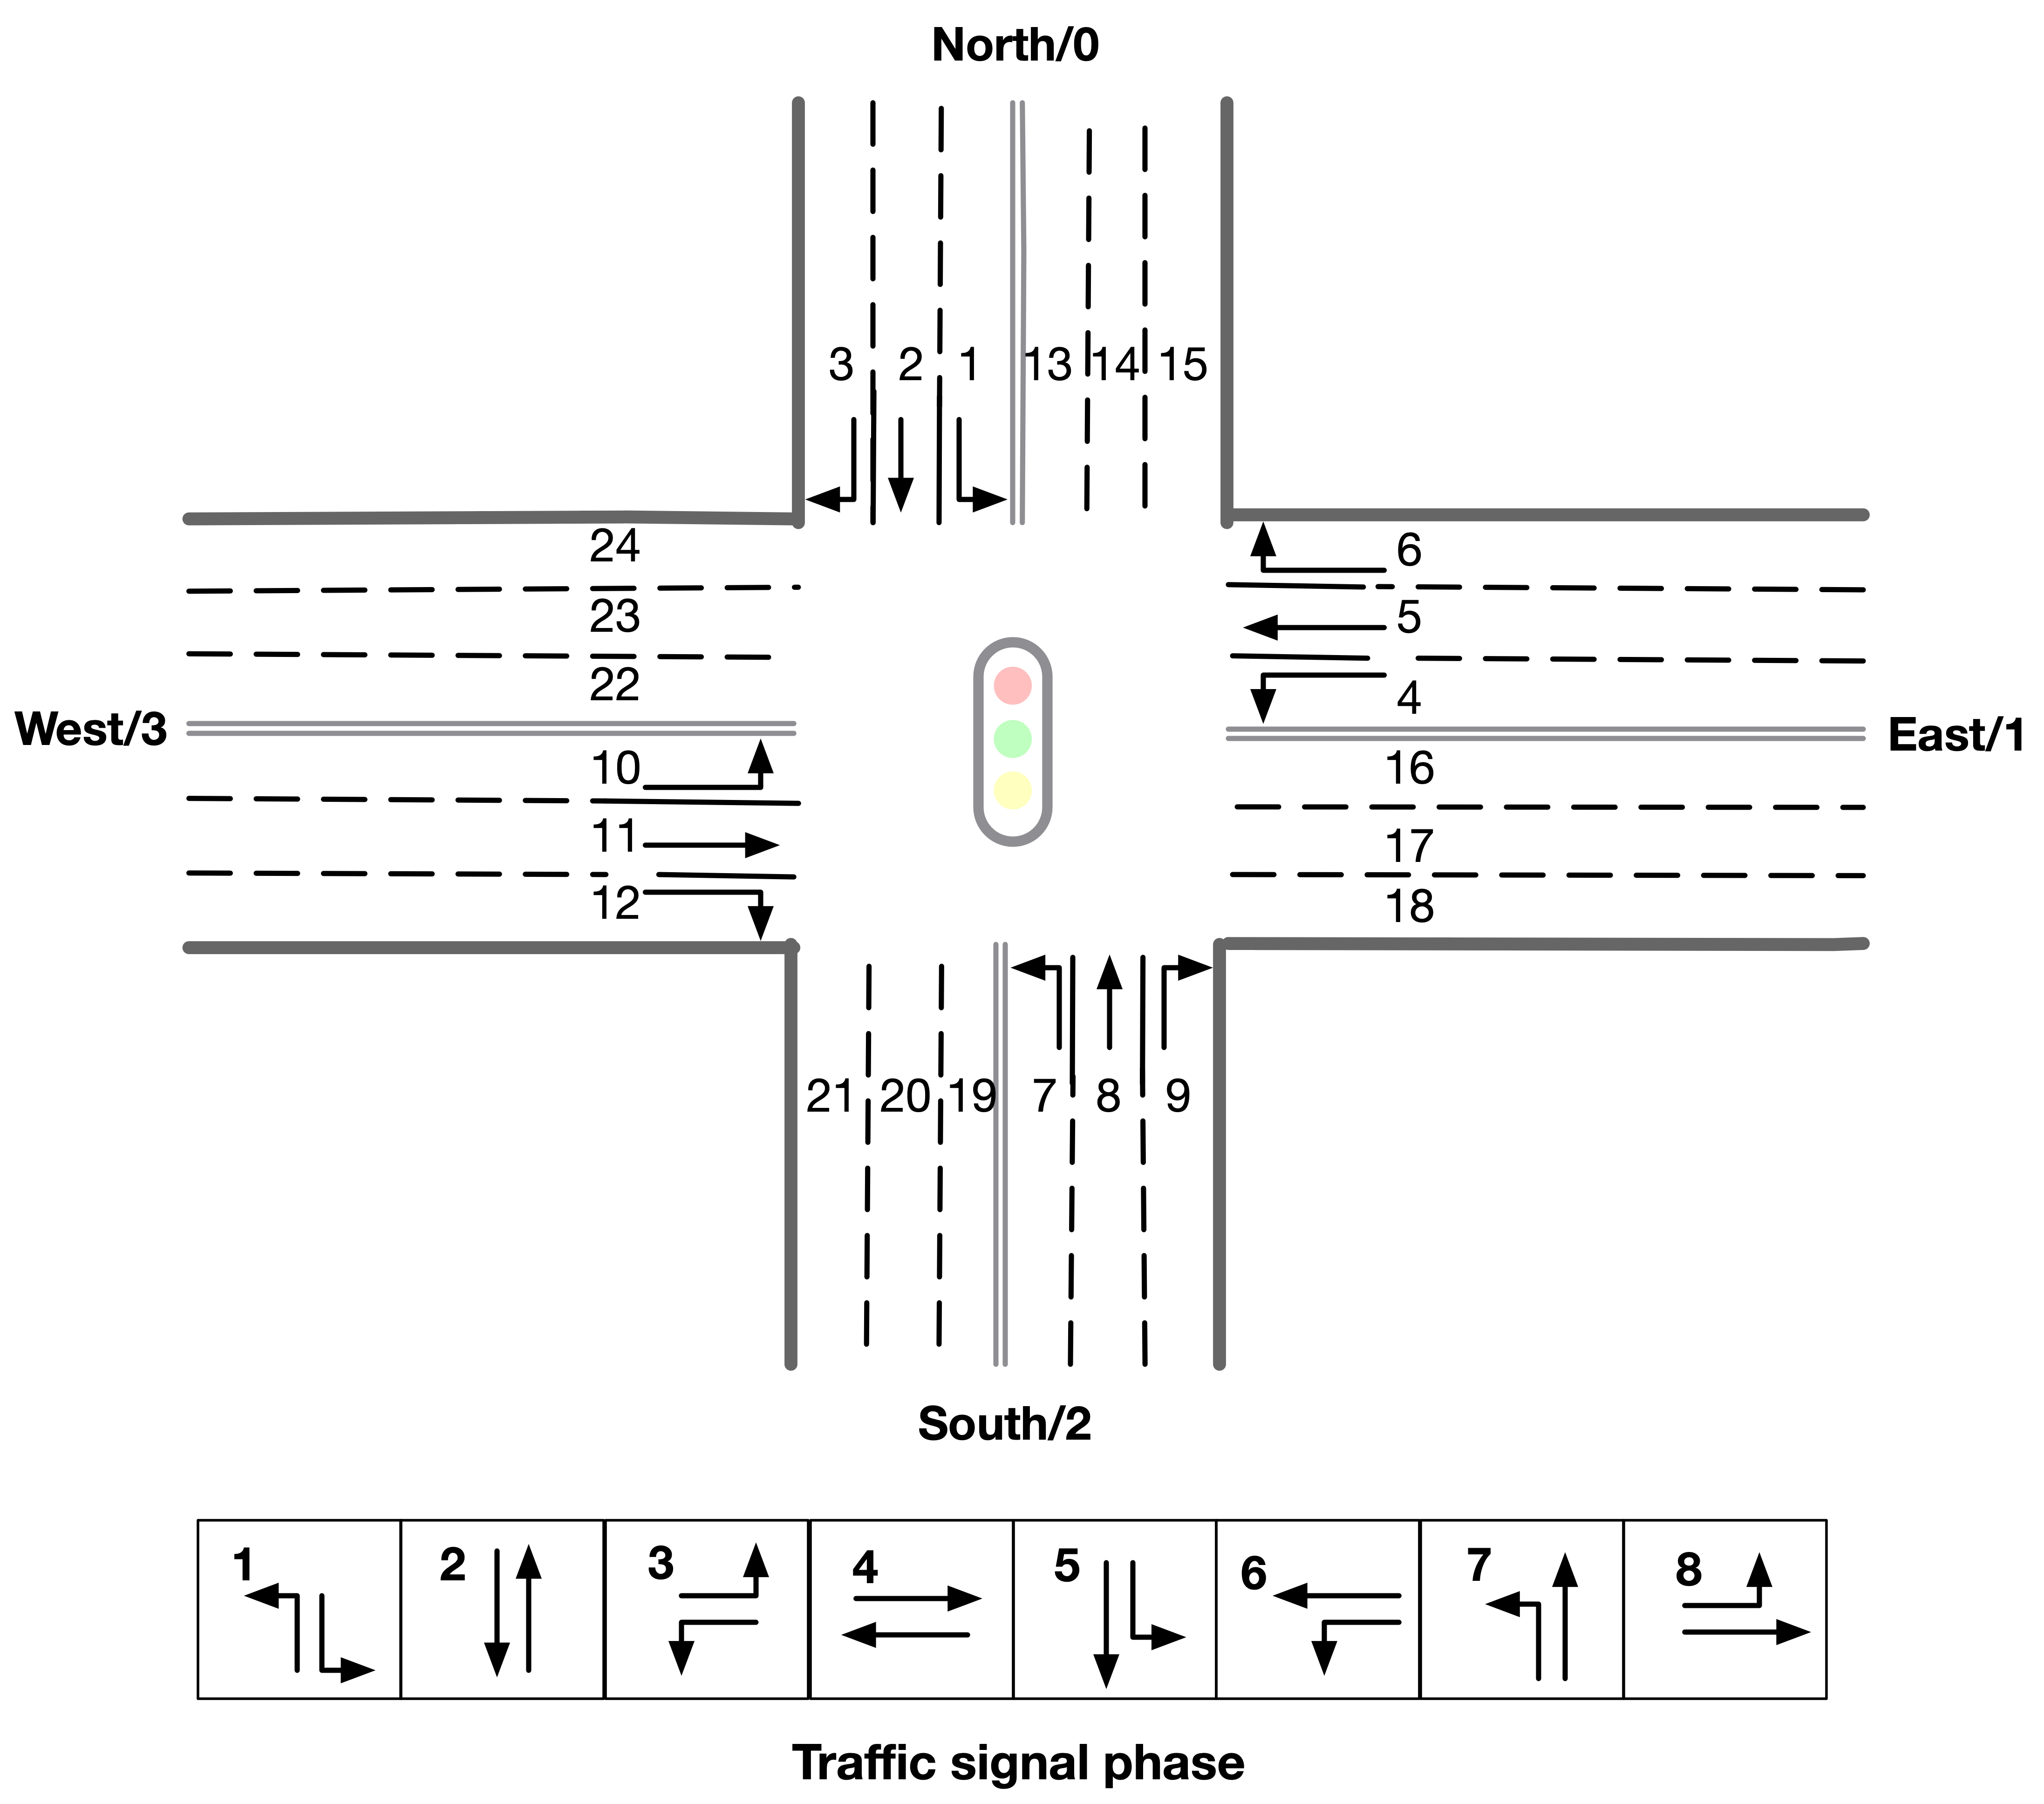
Phase and lane ordering
For example, if an agent is at phase 1, lane_1 and lane_7 along with all right turning lanes are passable. The index of the lanes in observation and reward could be found in observation format.
There are a total of 8 different types of phases for a standard four-way intersection. You can also learn how to set the traffic signals with the information given on the APIs page.
The action is defined as the traffic signal phase for each intersection to be selected at next 10 seconds. If an agent is switched to a different phase, there will be a 5 seconds period of ‘all red’ at the beginning of the next phase, which means all vehicles could not pass this intersection. We fix env.step() as 10 seconds for practical implementation consideration, which means the decision can be made every 10 seconds.
API functions
Based on the CBEngine, we provide APIs that share the similar parameters as the OpenAI Gym environment.
Simulation Initialization
env_config = {
    "simulator_cfg_file": simulator_cfg_file,
    "thread_num": 8,
    "gym_dict": gym_configs,
    "metric_period": 200,
    "vehicle_info_path": "/starter-kit/log/"
}
env = CBEngine_rllib_class(env_config)
- simulator_cfg_file:
the path of simulator.cfg
be used for initialize engine
Example
#configuration for simulator

# Time Parameters
start_time_epoch = 0
max_time_epoch = 3600

# Roadnet file and flow file used to simulate
road_file_addr : /starter-kit/data/roadnet_round3.txt
vehicle_file_addr : /starter-kit/data/flow_round3_flow0.txt


# Log configuration
# Don't change the value of report_log_mode
report_log_mode : normal
# Log path
report_log_addr : ./log/
# Log interval
report_log_rate = 10
# Log configuration to track the vehicle. Don't change the value
warning_stop_time_log = 100
- thread_num:
the thread number used for engine
- gym_dict:
the configuration used for initialize gym
a dict
The meaning of it is clarified at next section.
stored in /agent/gym_cfg.py, as a member variable of class
gym_cfg.
Example of
gym_dictgym_dict = { 'observation_features':['lane_vehicle_num'], 'observation_dimension':24, 'custom_observation' : False }
- metric_period:
the interval of scoring
At each intervals, output a score json file
- vehicle_info_path:
the path of vehicle informaton log
Environment Configuration: gym_cfg.py
gym_cfg.py in agent folder defines the configuration of gym environment. Currently it contains observation features. There are two options in observation features, namely lane_speed , lane_vehicle_num, which determines the content of observations you get from the env.step() api. You must write at least one of the two features.
class gym_cfg():
    def __init__(self):


        self.cfg = {
            'observation_features':['lane_vehicle_num'],
            'observation_dimension':24,
            'custom_observation' : False
        }
- self.cfg:
store the configuration of gym
custom_observation’: If ‘True’, use costom observation feature in CBEngine_round3.py. If ‘False’, use ‘observation_features’observation_features’ : Same as round2. Add ‘classic’ observation feature, which has dimension of 16. It’s order will be same as the order of observation fromenv.step()observation_dimension’ : The dimension of observation. Need to be correct both custom observation and default observation.
Simulation Step
step(actions):Simulate 10 seconds in engine.
The format of action is specified below.
return observation, reward, info, dones
The format of observations, rewards, infos and dones is specified below.
observation, reward, dones, info = env.step(action)
- actions:
Required to be a dict:
``{agent_id_1: phase_1, ... , agent_id_n: phase_n}``Set agent_id to some phase (The figure below demonstrates the allowed traffic movements in each phase)
The phase is required to be an integer in the range [1, 8] (note there is no 0)
The initial phases of all agents are set to 1
The phase of an agent will remain the same as the last phase if not specified in the dict actions
Attention: If an agent is switched to a different phase, there will be a 5 seconds period of ‘all red’ at this agent, which means all vehicles could not pass this intersection. If continuously switched to different phase, agent would be always ‘all red’.
In final round, agent_id will be str rather than int
- observations:
a dict
format:
{
    # agent_id : {'observation' : obs}
    '12647332106' : {'observation': [0, 0, 0, 0, 0, 0, 0, 2, 0, -1, -1, -1, 0, 0, 0, 0, 0, 0, 0, 0, 0, -1, -1, -1]}
}
The key is agent_id (str) , the value is a dict. The dict only contains one key “observation”, and its value is a list catenated by the order in
'observation_features'ofgym_cfg.pyFormat of the
'lane_speed','lane_vehicle_num'and'classic'observations_values are described below:
# observation values:

# 'lane_speed' sample: [-2, -2, -2, -2, -2, -2, -2, -2, -2, -2, -2, -2, -2, -2, -2, -2, -2, -2, -2, -2, -2, -2, -2, -2]
# There are 24 lanes left. The order of their roads is defined in 'signal' part of roadnet file
# the order is :inroad0lane0, inroad0lane1, inroad0lane2, inroad1lane0 ... inroad3lane2, outroad0lane0, outroad0lane1 ...
# Note that, [lane0, lane1, lane2] indicates the [left_turn lane, approach lane, right_turn lane] repespectively of the corresponding road.
# The order of roads are determined clockwise.
# If there is a -1 in the signal part of roadnet file (which indicates this road doesn't exist), then the returned observation of the corresponding lanes on this road are also 3 -1s.
# -2 indicating there's no vehicle on this lane

# 'lane_vehcile_num' sample [0, 0, 0, 0, 0, 0, 0, 0, 0, 0, 0, 0, 0, 0, 0, 0, 0, 0, 0, 0, 0, 0, 0, 0,]
# There are 24 lanes left. The order of their roads is defined in 'signal' part of roadnet file
# the order is :inroad0lane0, inroad0lane1, inroad0lane2, inroad1lane0 ... inroad3lane2, outroad0lane0, outroad0lane1 ...
# If there is -1 in signal part of roadnet file, then the lane of this road is filled with three -1.


# 'classic' sample: [1, 0, 0, 0, 3, 2, 1, 4, 1, 0, 0, 0, 1, 0, 0, 0]
# the first 8 values are the number of vehicles of left-turing and go-straight lanes ordered by the 'signal' part of roadnet file
# the last 8 values are the one-hot code indicates which lanes are available in last signal phase
- rewards:
a dict
key is str
must implement in
CBEngine_round3{agent_id_1: reward_values_1, …, agent_id_n: reward_values_n}
Format of reward_values:
reward in rllib needs to be single values. We provide 2 types of rewards definition as demos,
pressureandqueue length, along with the old rewards.
# Sample Output
{
0: -0.5
}
Here is an illustration of the lane index in observation and reward.
- info:
a dict
key is vehicle ID, values includes ‘distance’, ‘drivable’, ‘road’, ‘speed’ and ‘start_time’
{vehicle_id_1: vehicle_info_1, …, vehicle_id_m: vehicle_info_m}
env.set_info(1) to return a dictionary of vehicle information, otherwise, return an empty dictionary.
“route” and “t_ff” are removed from “vehicle_info” in final phase
0: # 0 is the vehicle ID
{
    "distance": [259.0], # The distance from this vehicle to the start point of current road.
    "drivable": [29301.0], # Current lane of this vehicle. Here 293 is the road segment ID, 01 indicates the middle lane (00 and 02 indicate inner and outer lanes respectively)
    "road": [293.0], # Current road of this vehicle.
    "speed": [0.0], # Current instantaneous speed of this vehicle.
    "start_time": [73.0], # Time of creation of this vehicle.
    },
...
}
- dones:
a dict
{agent_id_1: bool_value_1, …, agent_id_n: bool_value_n}
Indicating whether the simulation of an agent is ended.
Simulation Reset
reset:Reset the simulation
return a dict: observation
reset the engine
observation = env.reset()
Other interface
The following interfaces of simulation environment are also provided:
set_warning(flag):env.set_warning(0): set flag as False to turn off the warning of invalid phases. The warning will be issued if a green phase to an inexistent lane.
set_log(flag):env.set_log(0): set flag as False to turn off logs for a faster speed when training. Note that the score function will not work if the logging is turned off.
set_ui(flag):env.set_ui(0): set flag as False to turn off visualization logs for a faster speed when training.
set_info(flag):env.set_info(0): set flag as False to make info that returned from env.step to be None, which can make training faster.